
The first time you open an options chain, it looks like the departures board at an airport had a baby with a spreadsheet. Rows and rows of numbers, green on one side, red on the other, columns with names like "IV" and "OI" and "Theta." Most people close the tab. A few pretend to understand it and lose money. You're going to do neither.
Here's the truth nobody tells beginners: an options chain is just a menu. A restaurant menu has sections (appetizers, mains, desserts), each dish has a name, and each dish has a price. An options chain has sections (expiration dates), each "dish" is a contract at a certain price level, and each contract has a price you pay. Once you see it as a menu, the wall of numbers turns into something you can order from on purpose.
This guide assumes you have never traded anything in your life. We'll define every single term the first time it shows up, walk through the layout piece by piece, and finish with a checklist you can literally hold next to your screen on Monday. Let's go slow and get it right.
First, What Is an Option? (The 30-Second Version)
Before you can read the chain, you need to know what the thing on the chain even is. Skip this and every column is meaningless.
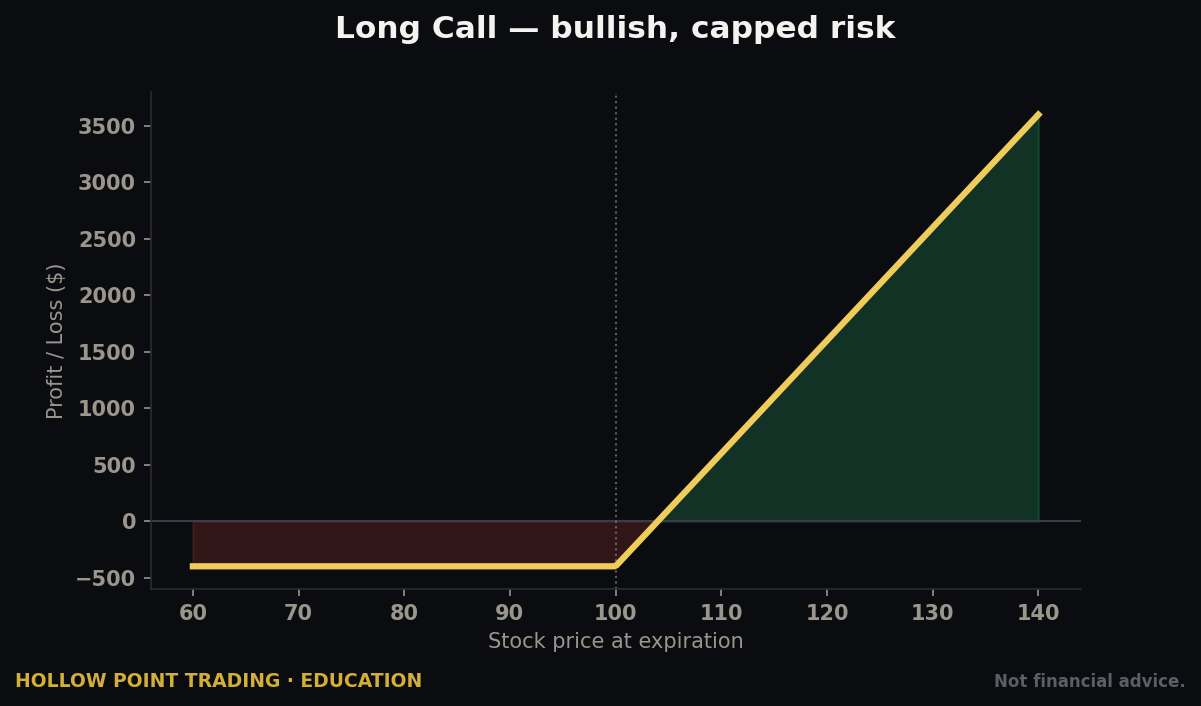
An option is a contract. It gives you the right — but not the obligation — to buy or sell a stock at a specific price, on or before a specific date. You pay a small fee for that right. That's it. That's the whole idea.
Think of it like putting a deposit on a house. Say a house is listed at $300,000. You pay the seller $5,000 for the right to buy it at $300,000 anytime in the next three months. If the house's value jumps to $340,000, your little $5,000 contract is now very valuable — you can buy at $300,000 something worth $340,000. If the house's value falls to $280,000, you just walk away and lose your $5,000 deposit. You were never forced to buy. That's an option: a controlled bet where the most you can lose is what you paid to play.
There are two flavors:
- A call is the right to buy a stock at a set price. You buy calls when you think the price is going up.
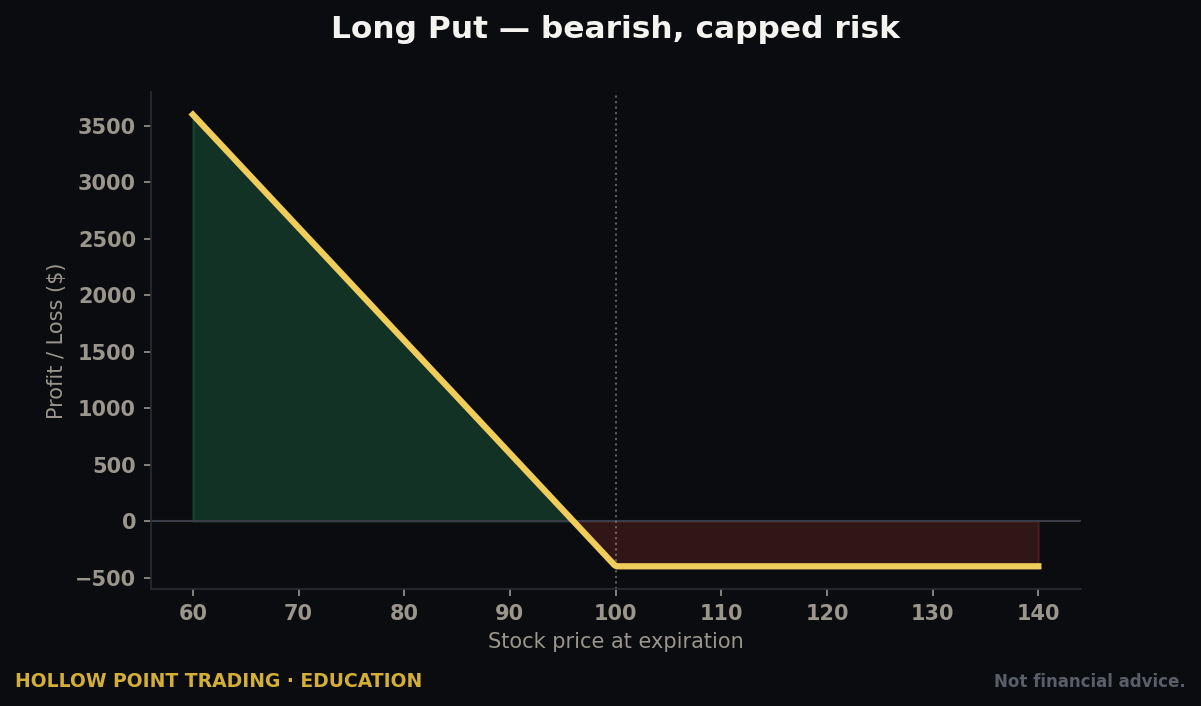
- A put is the right to sell a stock at a set price. You buy puts when you think the price is going down.
Remember it like this: Call = up, ceiling, "call it higher." Put = down, "put it in the ground." We'll use these constantly, so let that settle in.
Why a Beginner Should Even Care About Reading the Chain
You might be thinking, "Can't my app just show me a buy button?" It can — and that's exactly how beginners get hurt. The chain is where you find out what you're actually buying before money leaves your account.
Reading the chain lets you answer four questions that decide whether a trade is smart or a coin flip:
- What price level am I betting on? (the strike)
- How much time am I giving my idea to work? (the expiration)
- What will this cost me, and is it a fair price? (bid, ask, last)
- Is anyone else even trading this contract, or am I about to get stuck in something I can't sell? (volume and open interest)
At Hollow Point Trading, the whole philosophy is protect your capital first. You cannot protect capital you don't understand. The chain is the instrument panel. A pilot who can't read the panel doesn't fly — and a trader who can't read the chain doesn't trade. Simple as that.
The Big Picture: How the Chain Is Laid Out
Let's zoom all the way out before we zoom in. Almost every options chain — Robinhood, Fidelity, Schwab, ThinkorSwim, Tastytrade, Webull — follows the same basic skeleton. Learn the skeleton once and you can read any of them.
Here's the layout:
- At the top: the stock itself. Its name (the "ticker," e.g., AAPL for Apple), its current price, and how much it's up or down today.
- A row of dates: these are the expirations — the deadlines. You pick one date to work inside.
- A vertical list down the middle: these are the strike prices — the price levels you can bet on. They usually climb from low at the top to high at the bottom (or the reverse; either way they're evenly spaced).
- The left side: the calls (your "up" bets).
- The right side: the puts (your "down" bets).
So the strikes run down the spine of the page, calls fan out to the left, puts fan out to the right. Every strike price has a call and a put sitting on the same row. Picture a table set for two: the number in the middle is the seat, the fork on the left is the call, the knife on the right is the put.
One more universal habit to burn in: the current stock price sits somewhere in the middle of the strike list. Strikes above the current price and strikes below it are treated very differently, and the chain often draws a line or shades a band right where the stock is trading now. Find that line first, every time. It's your "you are here" dot on the map.
Piece #1 — Expirations: Choosing Your Deadline
The expiration date is the day your contract dies. After that date, the option is gone — either it was worth something and got cashed out, or it expired worthless and disappeared. This is the single biggest difference between options and stocks: a stock can be held forever; an option has a clock ticking on it.
On the chain, expirations are usually a row of dates you click between: this Friday, next Friday, two weeks out, a month out, a few months out, and sometimes a year or more out (those far-out ones are called LEAPS, but you don't need them yet).
Why does the date matter so much? Because time is one of the things you're literally paying for. An option that expires tomorrow is cheap but gives your idea almost no time to be right. An option that expires in three months costs more but gives your idea room to breathe.
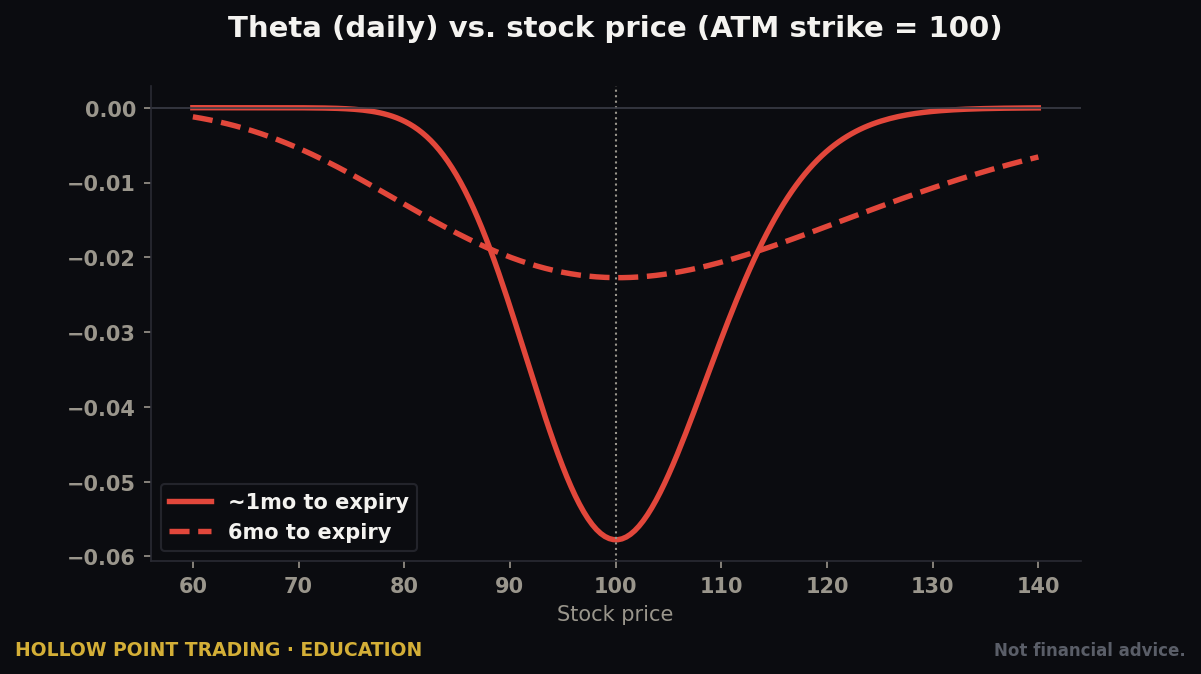
Here's the beginner trap, stated plainly: options lose value a little every single day just because time is passing. This slow bleed is called time decay (the technical name is theta, but "time decay" is all you need). It's like a melting ice cube in your hand. The closer you get to expiration, the faster the ice melts. Contracts that expire the same week — the super-cheap-looking ones beginners flock to — melt the fastest and are the most likely to go to zero.
Beginner rule of thumb: give yourself time. Many experienced traders won't buy an option with less than a few weeks on the clock, precisely because the melt is brutal in the final days. More time costs more up front, but it stops the clock from being your enemy on day one. When you're learning, buy time, not lottery tickets.
Piece #2 — Strikes: Choosing Your Price Level
The strike price is the price you're locking in. For a call, it's the price you'd get to buy the stock at. For a put, it's the price you'd get to sell the stock at. It's the "at a specific price" part of our earlier definition.
Strikes come in neat ladders — for a $50 stock you might see strikes at $45, $46, $47, $48, $49, $50, $51, and so on. For a $500 stock they might be spaced $5 apart. You pick one rung of the ladder.
Now here's a concept that unlocks half the chain. Every strike falls into one of three buckets depending on where the stock is right now:
- In the Money (ITM): the option already has real value baked in. A call is ITM when the stock price is above the strike (you could buy low, sell high right now). A put is ITM when the stock is below the strike.
- At the Money (ATM): the strike is right about where the stock is trading. Roughly break-even.
- Out of the Money (OTM): the option has no built-in value yet — it's a pure bet that the stock will move your way before the deadline. A call is OTM when the stock is below the strike. A put is OTM when the stock is above the strike.
Let's make it concrete. Apple is trading at $230.
- A $220 call is in the money — the right to buy at $220 something that's already $230 is worth at least $10.
- A $230 call is at the money — right on the price.
- A $245 call is out of the money — the right to buy at $245 something that's only $230 isn't worth anything yet; the stock has to climb past $245 first.
Flip it for puts: a $245 put (right to sell at $245) is in the money because the stock is only $230. A $220 put is out of the money.
Why beginners care: OTM options are cheap, which is exactly why beginners overload on them — they look like more bang for the buck. But cheap means "the market thinks this probably won't happen." Far-OTM options are the trades most likely to expire at zero. ITM options cost more but move more reliably with the stock and have real value to fall back on. There's a genuine trade-off here, and knowing which bucket you're in is how you make it on purpose instead of by accident.
Piece #3 — The Four Prices: Bid, Ask, Last, and Mark
Now we get to the columns everyone stares at. There are four price numbers you'll see for every contract, and confusing them is where real money gets wasted. Let's use a market-stall analogy the whole way through.
Imagine you're at a market trying to sell a used bike.
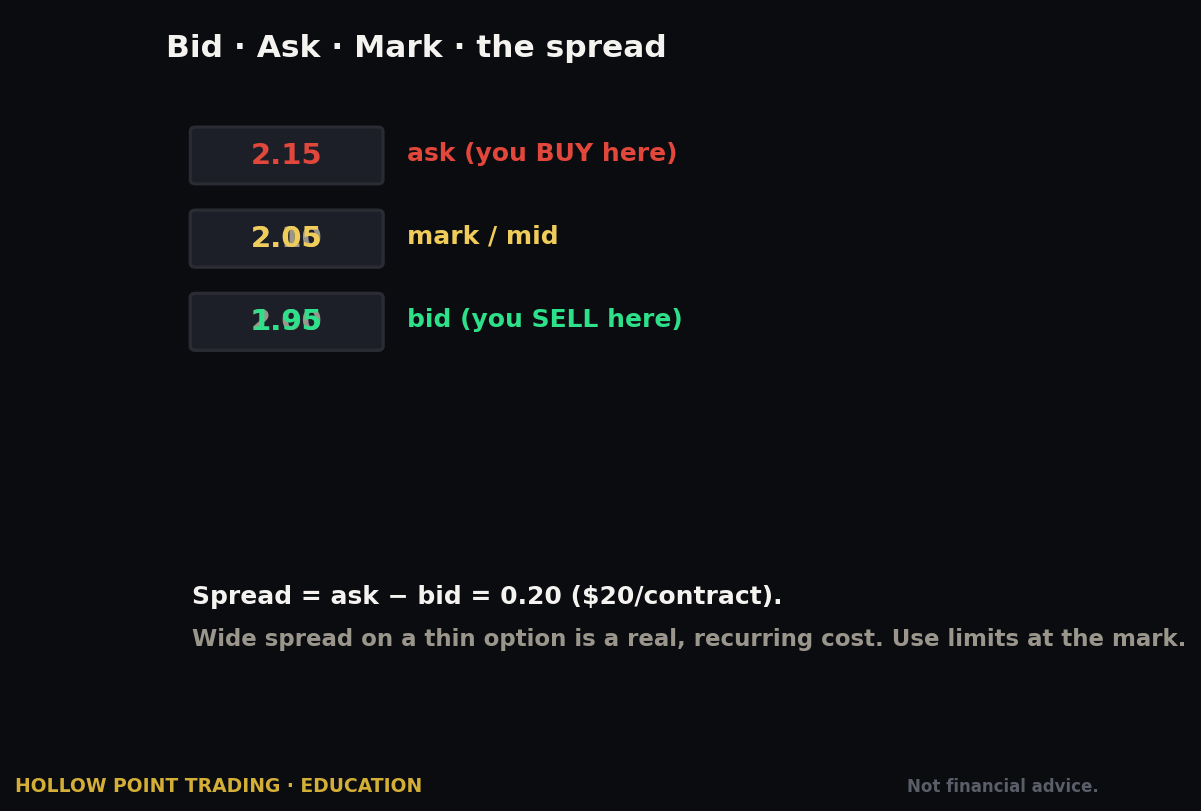
- The bid is the highest price a buyer is willing to pay you right now. "I'll give you $80 for that bike." If you want to sell, this is the price you get.
- The ask (sometimes called the "offer") is the lowest price a seller is willing to accept. "I won't let it go for less than $90." If you want to buy, this is the price you pay.
- The last is simply the price the most recent trade actually happened at. It's history — the last bike that changed hands went for $85. Useful context, but it's a past event, not what you'll pay right now.
- The mark (or "mid") is just the midpoint between bid and ask — here, $85. It's an estimate of fair value, and it's the number your account statement usually uses to value what you hold.
The critical takeaway: you buy at the ask and you sell at the bid. Beginners see the "last" price of $85, get excited it's cheap, then are shocked when it costs them $90 to actually buy. That's not a scam — that's just the difference between the buyer's price and the seller's price.
The Spread — the hidden cost nobody warns you about
The gap between the bid and the ask is called the spread. In our bike example, bid $80 and ask $90 means a $10 spread. That gap is a cost you pay just to get in and out.
Why? Because the instant you buy at the ask ($90), if you turned around and sold, you'd only get the bid ($80). You're down $10 before the stock has moved a penny. The wider the spread, the deeper the hole you start in.
Wide spreads are one of the biggest silent killers of beginner accounts. A contract might show a bid of $1.00 and an ask of $1.50 — a 50-cent spread on a $1.25 option is enormous. You'd need the option to gain 40% just to break even on the round trip. Tight spreads (say bid $1.20 / ask $1.25) are the mark of a healthy, heavily-traded contract. Favor tight spreads. Always. They're one of the clearest "is this contract even worth trading?" signals on the whole page.
One more essential number, and it's easy to miss: options are quoted per share, but sold in bundles of 100. One contract controls 100 shares. So an option showing a price of $1.25 actually costs you $125 (1.25 × 100). This is the number-one "wait, what?" moment for new traders. See $2.30 on the screen, know it's $230 out of your pocket. Multiply by 100, every time.
Piece #4 — Volume vs. Open Interest: Is Anyone Home?
These two columns are twins that beginners constantly mix up, and understanding the difference is what separates people who get stuck in trades from people who can get out cleanly. Both measure activity, but over different windows of time.
- Volume = how many contracts traded today. It resets to zero every morning. Think of it as the day's foot traffic through a store — how busy is it right now?
- Open Interest (OI) = how many contracts are currently alive and held open, added up across everyone. It's the total number of these contracts that exist and haven't been closed out yet. Think of it as how many members a gym has — the standing population, not just today's visitors.
An analogy that makes it click: imagine a used-car model. Volume is how many of that model got sold today. Open interest is how many of that model are out there on the road being owned right now. A car that sells a few today and has thousands on the road is easy to buy and sell — there's a real market. A car with zero sold today and only three on the road? Good luck finding a buyer when you want out.
Why a beginner must check both: these two numbers tell you about liquidity — a fancy word for "how easily can I get in and out without getting a terrible price." High volume and high open interest mean lots of people are actively trading this exact contract. That means tight spreads, fair fills, and — crucially — you can sell when you want to.
Low volume and low open interest mean the contract is a ghost town. You might buy it, watch it move your way, go to sell... and find there's no buyer, or the only buyer offers you a robbery price. You were right about the direction and still lost money because you couldn't exit. This happens to beginners constantly, and it feels deeply unfair, and it was completely avoidable.
Simple beginner filters: favor contracts with open interest in at least the hundreds (ideally thousands), and some volume today. When OI and volume are healthy, the spread is usually tight too — these signals all travel together. When they're thin, walk away no matter how good the setup looks. An untradeable good idea is worse than no idea, because it ties up your money and your attention.
Piece #5 — The Greek You'll Actually See: A Gentle Note on the Rest
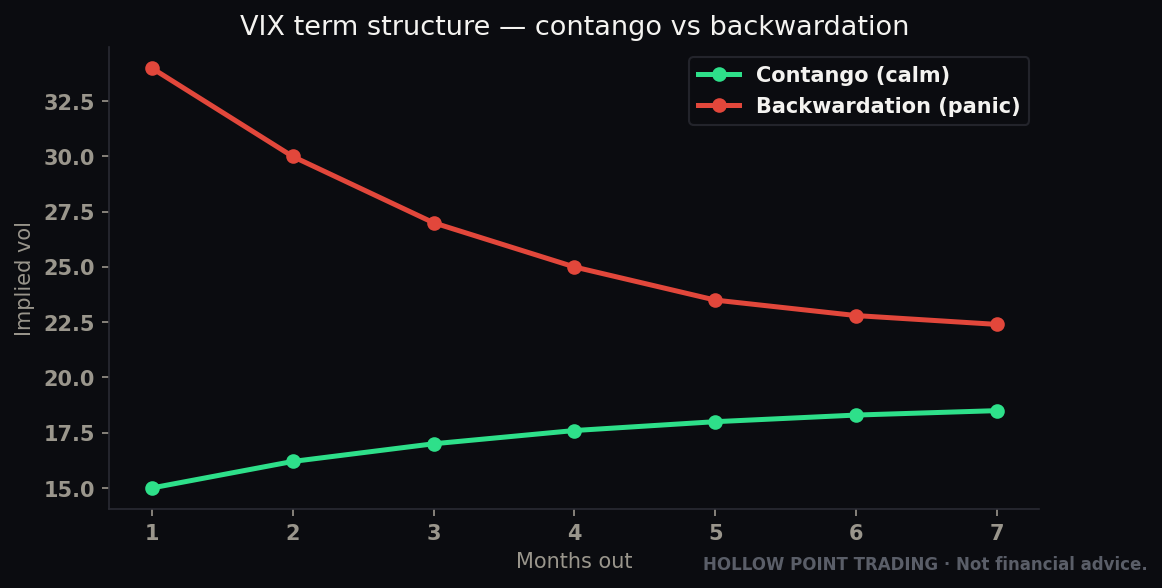
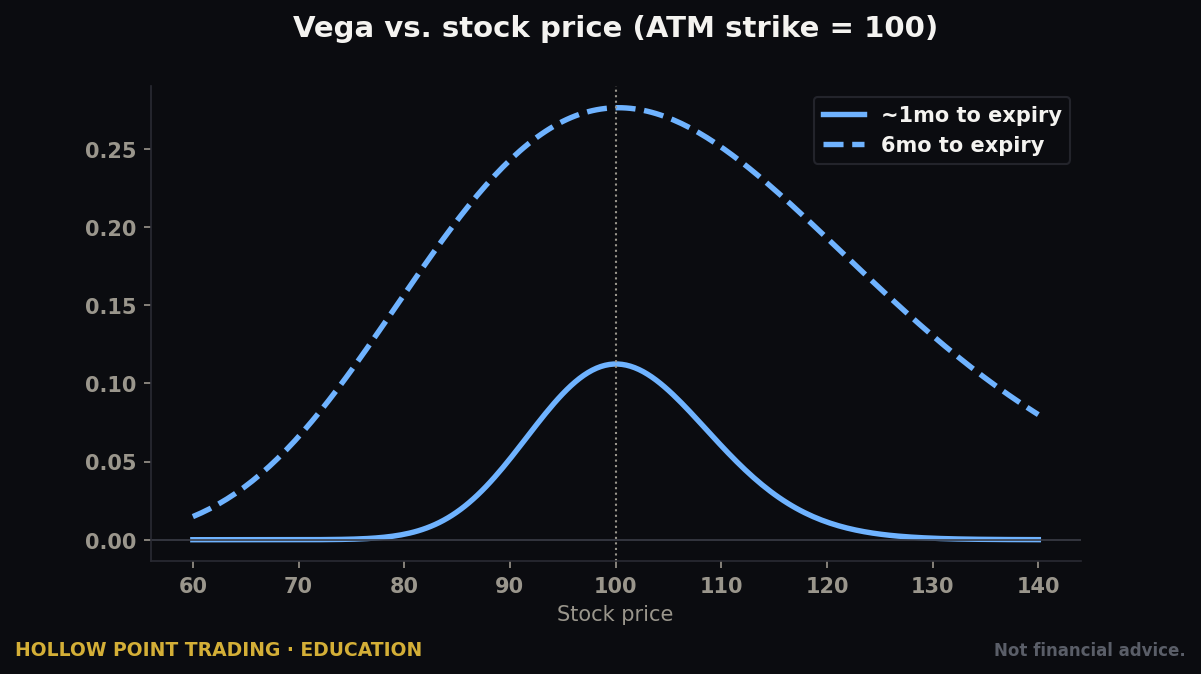
Your chain has more columns — IV (implied volatility, a measure of how much movement the market is pricing in), Delta, Gamma, Theta, Vega (the "Greeks," which measure how the option's price reacts to different forces). These matter, and you'll learn them. But for your first month of reading the chain, you do not need to master them, and pretending otherwise just paralyzes people.
Here's the one to half-remember now: theta is time decay — the melting ice cube we already talked about. A theta of -0.05 means the option loses about 5 cents ($5 per contract) each day, all else equal. Seeing it as a real number on the screen makes "time is your enemy" concrete. Everything else — park it. We'll cover the Greeks properly in their own beginner piece. Don't let unfamiliar columns scare you off the four things that actually decide your trade: strike, expiration, price, and liquidity.
A Fully Worked Example: Ordering Off the Menu, Start to Finish
Let's put every piece together with a slow, realistic walkthrough. Numbers here are illustrative — round and simple on purpose — but they behave like the real thing.
The setup. You've done your homework the HPT way — top down. The overall market looks healthy (macro), technology is the leading sector (sector), and within tech, a company we'll call "Nova Corp," ticker NOVA, is your pick (stock). NOVA is trading at $100 today. You think it climbs over the next several weeks. Up = call.
Step 1 — Pick the expiration. It's the first week of September. You want room for the idea to work, so you skip the contracts expiring this Friday (too little time, too much melt) and choose an expiration about six weeks out, in mid-October. You've bought your idea some breathing room.
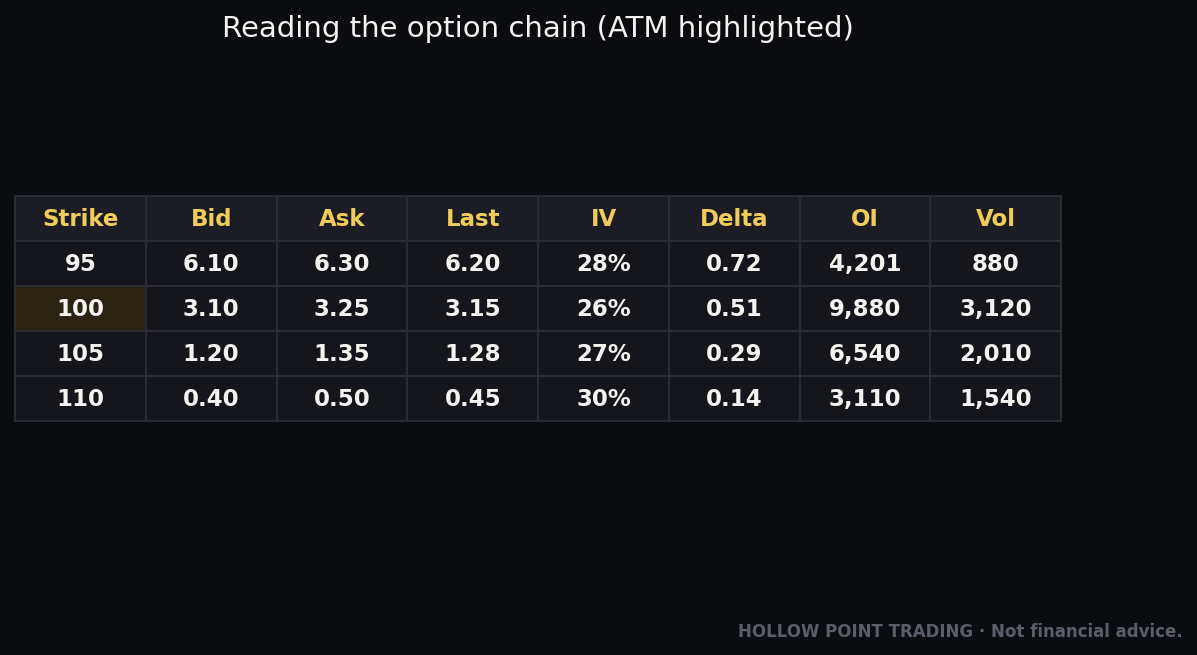
Step 2 — Pick the strike. NOVA is at $100. You look at the call side:
- $95 call — in the money (already has $5 of built-in value)
- $100 call — at the money
- $105 call — out of the money
- $110 call — further out of the money (cheaper, but a bigger move required)
As a beginner, you avoid the far-OTM $110 "lottery ticket." You choose the $105 call — slightly out of the money, a reasonable target for a stock you expect to rise. You're betting NOVA gets above $105 before mid-October.
Step 3 — Read the four prices. On the $105 call row you see:
- Bid: $2.10
- Ask: $2.30
- Last: $2.15
- Volume: 1,840
- Open Interest: 6,500
Let's translate. The spread is $2.30 − $2.10 = 20 cents — reasonably tight on a ~$2.20 option. Good sign. Volume (1,840) and open interest (6,500) are both healthy — plenty of people trading this exact contract, so you'll be able to sell when you want. Green lights across the liquidity board.
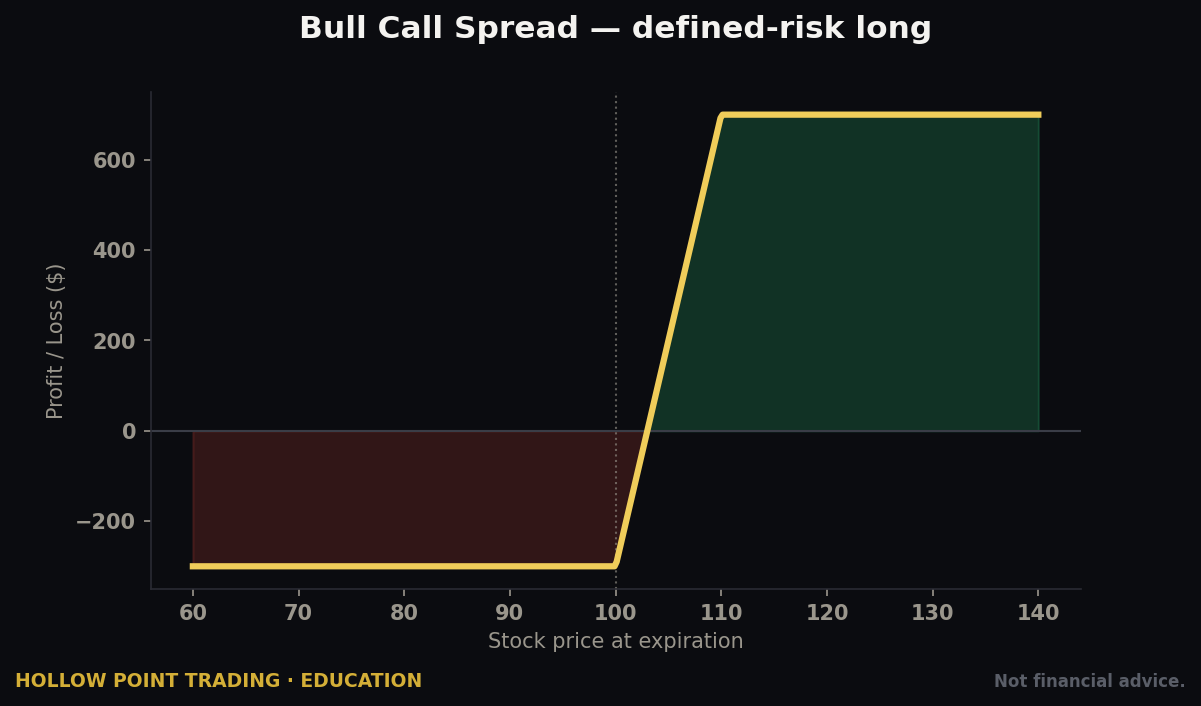
Step 4 — Know your real cost. You buy at the ask: $2.30. Times 100 shares per contract = $230 for one contract. That $230 is the most you can lose, full stop. Even if NOVA goes to zero, you can't lose more than the $230 you put in. That capped downside is the beautiful part of buying options — you always know your worst case before you click.
Step 5 — Know your break-even. For a call, break-even = strike + what you paid = $105 + $2.30 = $107.30. NOVA has to get above $107.30 by expiration for you to make money if you held to the end. (You don't have to hold to the end — you can sell the contract anytime the market's open — but knowing break-even keeps you honest about what you need.)
Step 6 — Frame the trade the HPT way. Hollow Point lives by 1:3 reward-to-risk — risk one dollar to make three. Your risk is defined: $230. So you'd want a plan where a realistic win is around $690 (three times your risk). If NOVA runs to $112, your $105 call would be worth roughly $7 ($700 per contract), turning $230 into ~$700 — right in that 1:3 zone. You set that as your target before you enter, and you decide in advance the point where you'll admit you're wrong and cut the loss. The plan comes before the trade, not after.
Notice what reading the chain gave you: an exact cost, a hard maximum loss, a break-even, a liquidity check, and a reward-to-risk frame — all before risking a cent. That's the difference between trading and gambling.
The Beginner Mistakes to Avoid (Read This Twice)
Every one of these has a body count of blown-up beginner accounts behind it. Learn them the cheap way — by reading.
1. Buying the cheapest thing on the screen. Far-OTM, expires-this-week options cost pennies for a reason: they almost always go to zero. Cheap is not the same as good value. You're usually buying a ticket the market has already told you probably won't pay out.
2. Forgetting the ×100 multiplier. That "$3.00" option is $300. Buy five of them and you've spent $1,500, not $15. Know your true dollar cost before you click, single every time.
3. Confusing "last" with what you'll pay. You pay the ask to buy. The last-traded price is history. Budget off the ask, not the pretty little "last" number.
4. Ignoring the spread. A bid $1.00 / ask $1.50 contract puts you 33% in the hole the instant you buy. Wide spreads quietly eat returns. Demand tight ones.
5. Trading ghost-town contracts. Low volume, low open interest = you might not be able to sell when you want. Being right and still losing because you couldn't exit is the most demoralizing loss there is. Check both numbers, every time.
6. Giving your idea no time. Same-week options melt fast. Buy time. When learning, err toward more days on the clock, not fewer.
7. Betting more than you can lose. Yes, the max loss is capped at what you paid — but if what you paid is your rent, capped doesn't help. Position size so a total loss is a shrug, not a crisis. Protect capital first, always.
8. Ordering before you read the whole menu. Strike, expiration, four prices, volume, open interest — all five checks, every single trade. Skipping steps is how beginners "somehow" end up in a contract they don't understand.
Your Options-Chain Cheat-Sheet
Tape this next to your screen. Run every line before you place a single trade.
The layout
- Calls on the left, puts on the right, strikes down the middle.
- Call = up. Put = down.
- Find the current stock price on the strike ladder first — that's your "you are here."
Direction
- Think it goes up → look at calls.
- Think it goes down → look at puts.
Expiration (the deadline)
- Give the idea time — lean toward weeks, not days.
- Remember: options melt as expiration nears (time decay). The last week melts fastest.
Strike (the price level)
- ITM = real value baked in, costs more, moves reliably.
- ATM = right at the money.
- OTM = cheap, pure bet, most likely to expire worthless. Don't overload.
The four prices
- You buy at the ask, sell at the bid.
- Last = history, not your cost.
- Spread = ask − bid. Tight = good. Wide = walk away.
- × 100: a $2.30 option costs $230.
Liquidity (can I get out?)
- Volume = traded today. Open interest = total alive.
- Want both healthy — hundreds to thousands. Ghost towns are traps.
Before you click
- Max loss = what you paid. Know the exact dollar figure.
- Break-even (call) = strike + price paid. (Put = strike − price paid.)
- Frame it 1:3 — risk one to make three — and set your exit before you enter.
How This Fits the Bigger Hollow Point Picture
Reading the chain is a skill, but at Hollow Point Trading it lives inside a philosophy, and the skill only pays off when it serves the philosophy.
It starts top-down: macro, then sector, then stock. You don't go hunting the chain for a lottery ticket. You form a view of the whole market first, narrow to the strongest sector, then to the right stock — and only then open the chain to express that view efficiently. The chain is the last step, not the first. A beginner who opens the chain looking for excitement has the whole process backward.
Then comes discipline over prediction. Nobody knows what happens next — not you, not me, not the loudest account on the internet. What separates traders who last from traders who flame out isn't better guesses; it's better rules. Reading the chain correctly is a rule. Demanding tight spreads is a rule. Checking open interest is a rule. Sizing so a total loss is survivable is a rule. Each one is a small, unglamorous wall between you and the mistakes that end accounts.
And it all serves the first commandment: protect your capital. You cannot win the game if you're removed from the table. Every skill in this guide — knowing your true cost, capping your loss, avoiding untradeable contracts, framing 1:3 reward-to-risk — exists to keep you in the seat long enough for your edge to show up. The chain isn't where you get rich quick. It's where a disciplined trader places a controlled, well-understood bet, again and again, and lets the rules do the heavy lifting.
You now know how to read the menu. Next time it's how to price what's on it — the Greeks, made just as simple. Take this cheat-sheet, open your broker's chain in a "paper trading" (fake money) account, and just read ten contracts without buying anything. Find the current price. Name the ITM, ATM, and OTM strikes. Spot the tight spreads and the wide ones. Find the ghost towns. Do that a few times and the wall of numbers becomes exactly what it always was: a menu you can order from, on purpose, with your eyes open.
Bound by rules, feared by trade.